Receive Buffers And Other Tips To Improve Your Internet Connection
Dhir Acharya - May 29, 2025
Working on the receive buffers is one of the several ways of improving internet connections on your computer. This post will show you other useful methods.
- This Trackball Contains All Of Its Electronics Inside
- Internet Shutdowns In India By The Government Caused A $2.7 Billion Loss In 2020
- You May Not Know These Things From Before The Internet
Many people have fiddled around with the network adapter properties menu in their Windows computer. Sometimes you change the DNS gateways, disable and enable the adapter, or even changing your IP addresses when you need to. But in addition to these basic tricks, you can do a lot of stuff to make the most of your network, which we will show you in this post, involving the receive buffers. You can control the network adapter settings and options for wired and wireless connections. This post will include some essential tips.

Before getting started, if you don’t know where to find the menu in Windows 10, head to Settings > Network & Internet, then click on the Ethernet option in the left column and click on Change adapter options located on the right. Here, you will see all of your WiFi and Ethernet network adapters, including virtual ones that your VPN software or virtual machines created. Keep in mind that when making changes, you need to work on the adapter that has an active internet connection. That means if you are using a wireless internet connection, you need to make all the changes to your WiFi adapter.
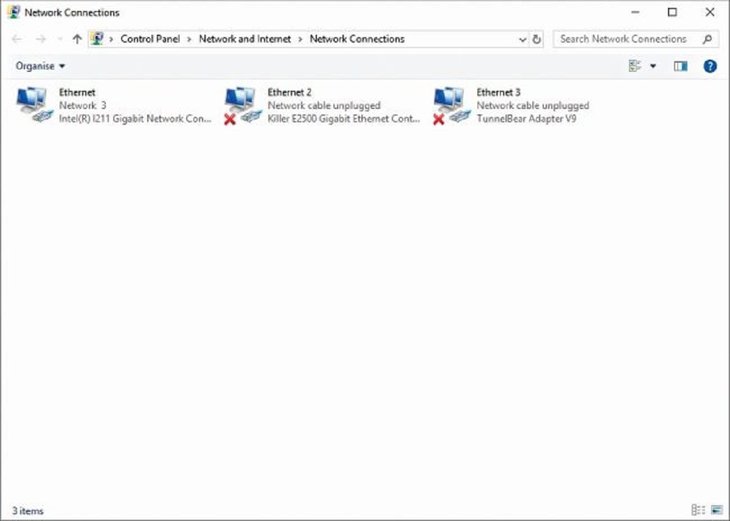
There’s another way to access the network adapter page, which is right-clicking on the Network item located on the system tray and clicking on Open Network & Internet Settings. This way, you won’t have to open Settings first. Or you can type ‘Ethernet settings’ into the search bar in the Start menu, which will launch the Ethernet window. Or you can press Win+X then press W, which will take you straight to the Network & Internet window.
Enter a third-party DNS server address manually
You may not be able to control your external IP address by default, but you can change your DNS server address. While some ISPs have DNS servers of their own, most users use Google’s DNS server.
However, there are a lot more options for DNS servers available with many benefits as well. Some are hyper-fast and some offer better security. If you change the DNS server, you will be able to access websites that the service provider has blocked.
Your DNS server resolves website URLs, so its speed can become the defining point. You can consider using DNS servers offered by Cloudflare, which are 1.0.0.1 and 1.1.1.1. Or you can choose Google’s DNS servers, which are 8.8.4.4 and 8.8.8.8.
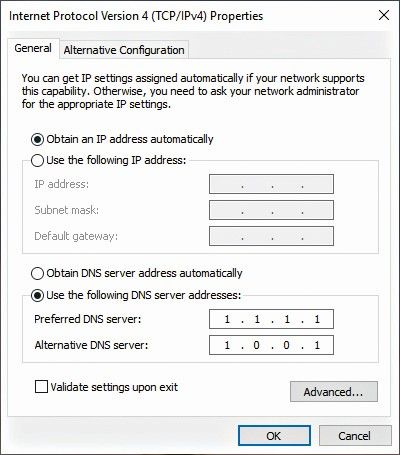
You just need to visit the network adapter properties menu, double-click the ‘Internet Protocol Version 4 (TCP/IPv4)’ option, and you will see a pop-up window. Next, click on ‘Use the following DNS server addresses’ and enter the addresses mentioned above.
If you want to add more, you just have to click on Advanced and open the DNS tab, which allows you to add as many servers as you want and sort them out based on a connection priority.
Assign higher receive buffers or transmit buffers
What is receive buffers, you may wonder. When you are receiving or sending packets, there is a buffer in the system memory used by the adapter. A higher buffer size will offer higher performance. However, as you raise the buffer size, you also increase the memory footprint. By default, a system is often set to an optimal size automatically, which is 256 in most cases. You should find the Transmit and Receive Buffer in the list.
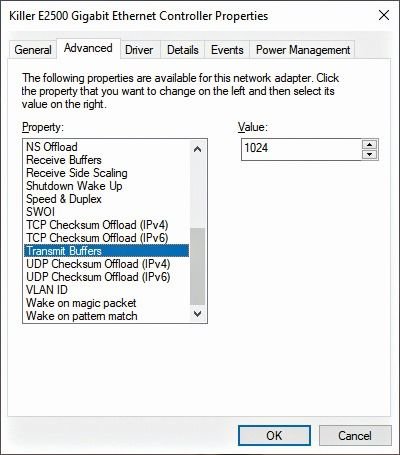
What is the max receive buffers? The recommended answer here is 512 or 1024, or you can opt for 2048 if your RAM can support it. Make sure that the transmit buffer size is twice that of the receive buffer. Also, a buffer size lower than 256 will result in dropped packets but don’t use a huge buffer size immediately, you need to test until you get the optimal size for your system memory.
Disable File and Printer Sharing for Microsoft Networks
For those using one PC setup and not connecting any other Windows machine to your network, you do not need the ‘File and Printer Sharing for Microsoft Networks’ and ‘Clients for Microsoft Networks’ in Ethernet Properties. So, you can disable them to improve the speed and security of your systems. Those using a multi-PC setup should not disable this feature.
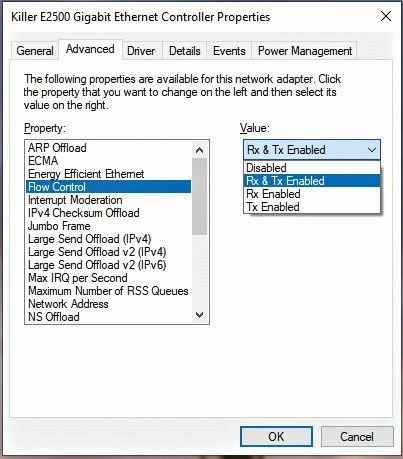
Increase traffic regulation efficiency using Flow Control
You can disable Flow Control to increase the traffic regulation efficiency for connections. The implementation of Flow Control is said to be buggy in some network adapters, which impacts the connection. Disabling Flow Control will reduce timeouts as well as improve throughput. But before disabling it, you should read to understand how good its implementation is in the network adapter of your system.
Disable interrupt moderation
The interrupt moderation rate determines how often the adapter interrupts the system so as to manage the outgoing and incoming packets. The high and low rates have their own up and downsides.
A higher rate means the CPU utilization drops so you will get better machine performance but less responsive packet handling. On the other hand, a lower rate means the CPU utilization goes up, which affects the machine performance but results in more responsive packet handling.
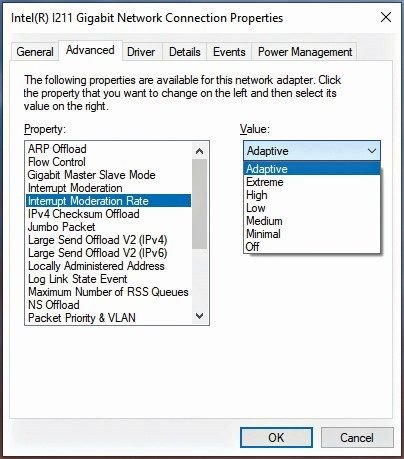
If you directly disable interrupt moderation, you will get the lowest possible latency but this means lower machine performance. For gamers who play multiplayer games with a powerful CPU, you’d better disable interrupt moderation.
>>> Early Adopters Of Starlink Reported 4K Streaming On YouTube With No Buffering
Featured Stories

How To - Mar 04, 2026
Getting Started with AI: A Newbie's Simple Guide

Features - Jun 11, 2025
Best VPN for PUBG Mobile 2025: Lower Ping & Regional Access Guide

How To - Jun 04, 2025
What is a VPN? Your Complete Guide to Safe Virtual Private Networks

How To - May 21, 2025
How to unlock a disabled iPhone: a step-by-step guide

How To - Mar 31, 2025
Elevate Your Online Presence: Partnering with a Small Business Digital Marketing...

How To - Aug 03, 2023
What is the Yo-Yo test in Indian Cricket?

How To - Jul 10, 2023
Top 7 Stats Sites Every Cricket Fan Must Know

How To - Apr 27, 2023
How much does it cost to start an online casino in 2023

Review - Oct 17, 2022
Betting on Sports Events in the Fairplay App

How To - Oct 07, 2022
How to Run a Turnkey Casino Business in 2022?
Read more
ICT News- Jul 29, 2026
The RAM Crisis: Graphics cards shoot up in prices again
Until memory production capacity catches up, graphics cards are likely to remain more expensive than many enthusiasts hoped.
Comments
Sort by Newest | Popular