Detailed Guidelines On Recording Screen On Your Computer
SachinSangwan - Aug 31, 2019

- Receive Buffers And Other Tips To Improve Your Internet Connection
- This Trackball Contains All Of Its Electronics Inside
- Your Mac Is No Longer Safe: Thunderbolt Ports Let Badass Rip Off Data In Minutes
If you are a YouTuber or gamer, your work must involve recording your projects. Today, companies offer in-built webcams and microphones, but their quality is not good enough. If you want to record videos, you need to purchase a mic and camera separately. And even they don't come up with enough features recording screen on your PC.
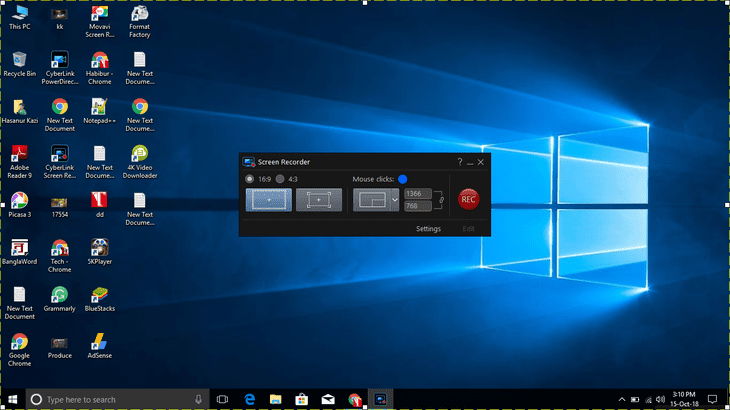
Now, let's come on the point, how to capture a laptop or computer screen using some in-built features? Below, we have mentioned several professional software and apps which offer you a powerful tool for recording your device screen.
Recording desktop screen in Windows 10
If you don't want to download any other software or apps for this task, it's okay. It's likely that you already have an app which can do this work for you as listed below.
1. Microsoft Office - PowerPoint
Hey, do you know about Microsoft Office PowerPoint? If yes, can you imagine that you can also record your desktop screen using the in-built tool of this software? Yes, you read it right, Microsoft offers screen recording feature in its latest version of MS Office. Follow the steps given below to learn how to use it:
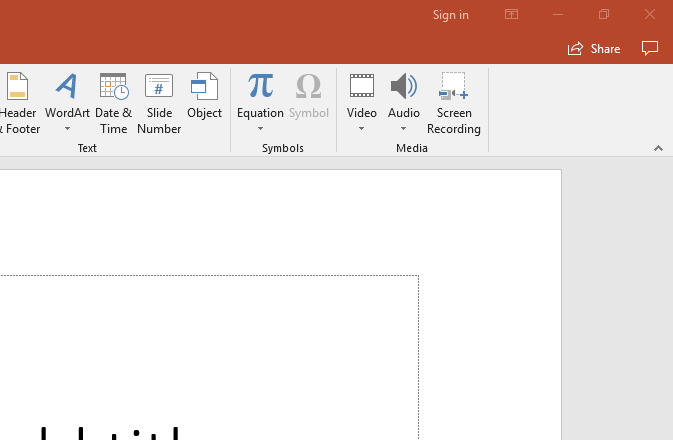
- Open MS PowerPoint and go to the Insert tab, click on the button 'Screen Recording.'
- If you need to record the whole screen, you can use the shortcut 'Windows Key + Shift + F.' Otherwise, click on Selec Area to record a specific area.
- Tap on 'Record' or press 'Windows Key + Shift + R.'
- If you want to halt the video, click on the Pause button and click on the Stop button to end the recording.
Once the recording is completed, you can either embed the video or save it as a file. In this method, controlling and editing is very limited, but it's quick to use, especially for presentations. You can also take advantage of several enhancement tools like changing the shape of the video, adding effects such as glow, shadows, etc., as well as adding borders.
2. Live Streaming feature of YouTube
If you want to publish videos on your social media platform or other platforms like YouTube, but don't want to spend too much time recording it, you can take advantage of YouTube.
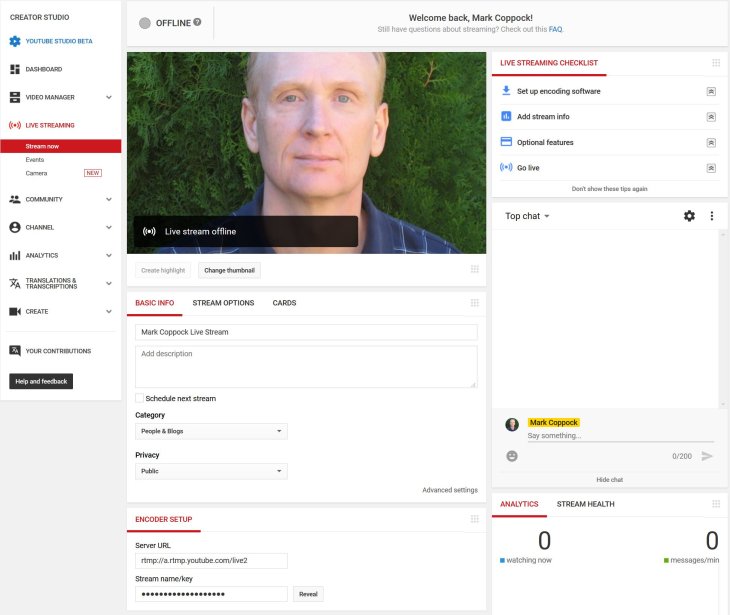
- Firstly, you need to Log in your YouTube channel account in Chrome.
- Head to the top right corner and click on the profile picture. Now, click on YouTube Studio (beta).
- At last, in Other Features, click 'Live Events' if necessary, then click on New live event.
- Fill all the asked information in the given fields and select either Custom or Quick as per your requirements. Here, the 'Custom' option allows you to change the multiple recording settings for your content. On the other hand, 'Quick' does not offer any additional settings. After clicking, it will open the streaming window
- When you are ready, hit the 'Go Live Now' button and choose the Screenshare button, which you'll find in the top left corner.
- When you are done, click on the 'Stop Streaming' button and save it
Other software for recording screen like professionals
If you really want to capture screen especially for games like professionals or want to record a video with good quality, you can use the software mentioned below:
Open Broadcaster Software (OBS)
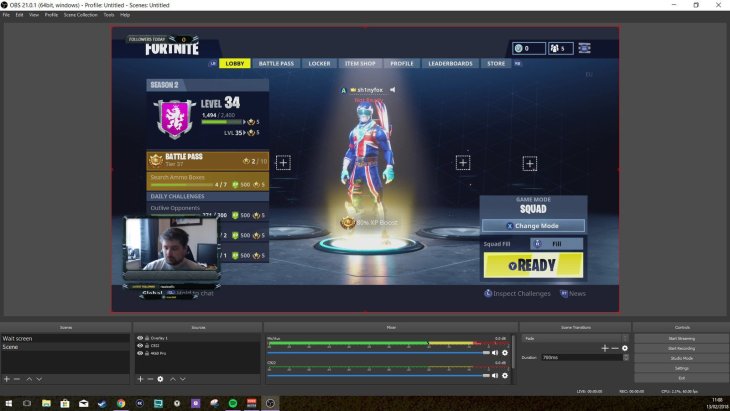
OBS Studio is a more advanced open-source screen recording software. It allows you to record full screen without any watermark. It also features streaming for those who have live subscribers while recording. And it has excellent hardware support by which 60 frames per second video recording is possible without any lag. It offers many features, but for those, it takes a little bit longer time to set up personal preferences. Still, it is the best screen recorder software which is completely free for all and with lifetime activation.
Screen Recording in macOS - Quick Time Player
If you work on macOS, you might be using QuickTime player for capturing screen and audio recording. But it is not an easy task to edit the recorded clips of QuickTime Player. So if you want to record screen with ease, you need to follow the steps given below.
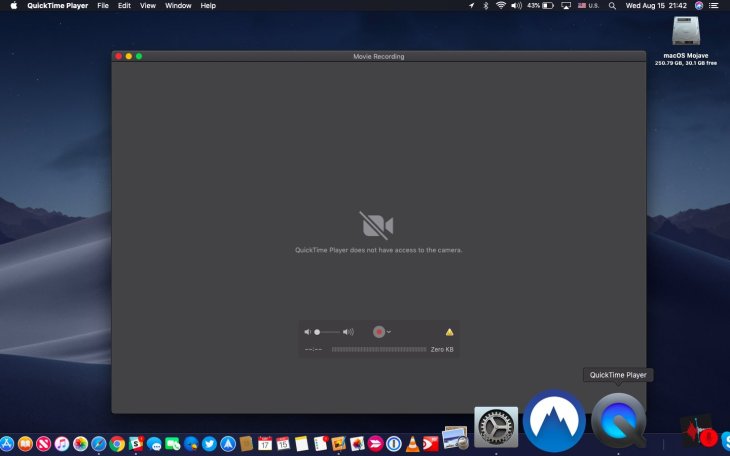
- Firstly, open the software.
- Head to 'File', and click on 'New Screen Recording.'
- In a small drop-down box, you can choose whether you want to record mouse click and internal sounds or not. This also offers you an option to select a particular camera, in case you have multiple cameras.
- Click on the circular red dot button when you are ready for recording.
- Now you need to decide which part of the screen you want to capture. You have an option for full-screen recording and for a specific area. For recording just click and drag a rectangular box then hit the 'Start Recording' button.
- When you are done with the recording, go to the 'Menu' tab and click on the 'Stop Recording' button.
- For saving, go to 'File' and click on 'Save' then select the desired location with an appropriate title.
MacOS screen recorder
In the latest macOS Mojave, Apple offers a new feature which allows users to record the screen and take screenshots as well with the support of the screen capture tool. If you have an updated macOS version, here's how you can do this task.
- You simply need to press Command + Shift + 5; it opens screenshot toolbar on your device.
- Here, you'll need to choose the option for recording. There are two options, one is full-screen recording and second for recording a specific area. If you go with the latter one, you have to choose what you want to record; otherwise, it will start the recording immediately.
- After the recording has been completed, click on the 'Stop' button to stop it.
- When you stop the recording, it will be shown at the bottom of the screen as a thumbnail, simply click on it and save recording or screenshot files at the desired location.
Featured Stories

How To - Mar 04, 2026
Getting Started with AI: A Newbie's Simple Guide

Features - Jun 11, 2025
Best VPN for PUBG Mobile 2025: Lower Ping & Regional Access Guide

How To - Jun 04, 2025
What is a VPN? Your Complete Guide to Safe Virtual Private Networks

How To - May 29, 2025
Receive Buffers And Other Tips To Improve Your Internet Connection
How To - May 21, 2025
How to unlock a disabled iPhone: a step-by-step guide

How To - Mar 31, 2025
Elevate Your Online Presence: Partnering with a Small Business Digital Marketing...

How To - Aug 03, 2023
What is the Yo-Yo test in Indian Cricket?

How To - Jul 10, 2023
Top 7 Stats Sites Every Cricket Fan Must Know

How To - Apr 27, 2023
How much does it cost to start an online casino in 2023

Review - Oct 17, 2022
Comments
Sort by Newest | Popular