How To Take Great Pictures With Samsung Galaxy S10, S10 Plus, And S10e
Aadhya Khatri - Jul 01, 2019

The cameras of Samsung Galaxy S10, S10 Plus, and S10e have lots of power waiting to be unlocked. However, not many users know how to use that capacity
- Samsung Galaxy S10, S10 Lite, And Note 10 Get New Features From The Galaxy S20 Lineup
- Here Are Benchmark Scores Of Samsung Galaxy S20 & Galaxy S10
- Using Samsung Smartphones, Celebs Threatened To Release Nude Photos
The cameras of Samsung Galaxy S10, S10 Plus, and S10e have lots of power waiting to be unlocked. However, not many users know the way to use that capacity to generate great pictures. So here are some top tips to get the most out of them.
Camera Specs

There are differences users should be aware of between Galaxy S10, S10 Plus, and S10e. However, all of the tips can be applied to the three of them.
On the rear, the Galaxy S10 and S10 Plus feature a triple-camera setup making up of a 12 MP with a variable of f/1.5 to f/2.4 aperture, a 16 MP ultra-wide-angle lens coupled with an f/2.2 aperture, and a 12 MP telephoto lens accompanied by an f/2.4 aperture. On the Galaxy S10e, we have a dual camera arrangement without the 12 MP telephoto lens. All of the three phones support HDR and OIS (short for optical image stabilization) in all of the 12 MP lenses. The telephoto lenses allow for 2x optical zoom on the Galaxy S10 and S10 Plus.
The three phones are capable of recording 4K UHD video at 60 fps, 1080p at 240 fps, and 720p at 960 fps. Users also have HDR10+ support.
On the other side, the Galaxy S10 Plus stands out for having a dual-camera setup consisting of a 10 MP with an f/1.9 aperture, and an 8 MP with an f/2.2 aperture for pictures with more depth. It can record 4K video at 30 fps.
Getting Started
Out of the box, the icon for camera will be at the phone screen's bottom right. When the phone is not locked, you can access the camera by tapping at it; otherwise, you have to drag it to the center.
Another way to initiate the camera app is to press the power button two times. This should go with the phone by default, but if for some reason, it is not, here is what you need to do: access Settings and find Quick Launch.
When the camera app is on, pressing the power button two times to change between the front and the rear cameras.
The Camera App

Samsung Galaxy S10 camera app is straight forward, but since it has quite a lot of features, users may need a certain amount of time to get used to it. On the right, you can see different camera modes to choose from according to what you want to capture.
To access the list of available modes, users can swipe up or down in landscape view, and right or left in portrait.
To change back and forth between the front and rear cameras, users can tap the arrow icons near the shutter button. On the other side you will see the last photo you take, tapping it and you open it in the Gallery app.
Look at the top of the screen, and you will find some white icons, an option for Bixby Vision, and AR Emoji. You can use Bixby Vision on objects to shop for them or to try on make-up. The AR Emoji can be used to create a cartoonish version of you but what it made is far from resembling you. The while icons are the settings, consisting of the flash, the aspect ratio, the timer, and a wand that lets you access 12 live filters or accessing Beauty mode.
There is a wide range of modes in the camera app, and if you find that you do not need all of them, you can clear them out. You can always turn them on later if you need. To do this, access Camera modes>Edit modes. For the ones you do not want to appear, turn them on. Dragging and tapping will also change the order you see them.
How To Use The Wide-Angle Or Telephoto Lens

When you first access the camera app, you will be at the main camera lens. Look on the right, and you will see the tree icons to change the lens. The two-tree icon is the main lens, the three-tree one is the wide-angle lens, and the one-tree is for the telephoto lens.
How To Use Scene Optimizer
Scene Optimizer makes use of AI to better detect scenes for the best pictures possible. To turn it on or off, you can tap on the blue swirl icon on the right.
How To Use Shot Suggestions
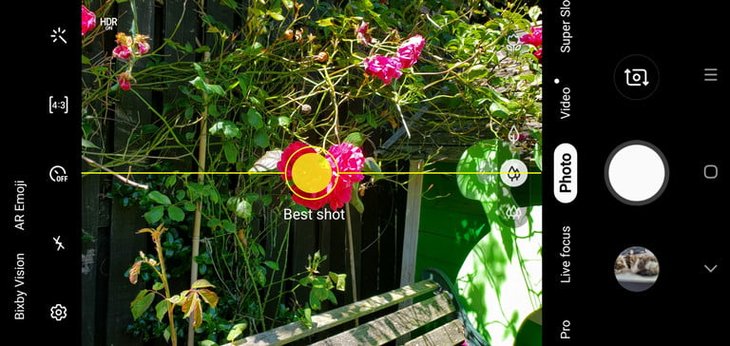
One of the most-loved features on the Galaxy S10 is the Shot suggestion. You will see a horizontal line to match and a point that the phone considers the best spot to take a picture. When your camera is in the right position, the line and the spot will turn yellow to notify you.
How To Use Pro Mode
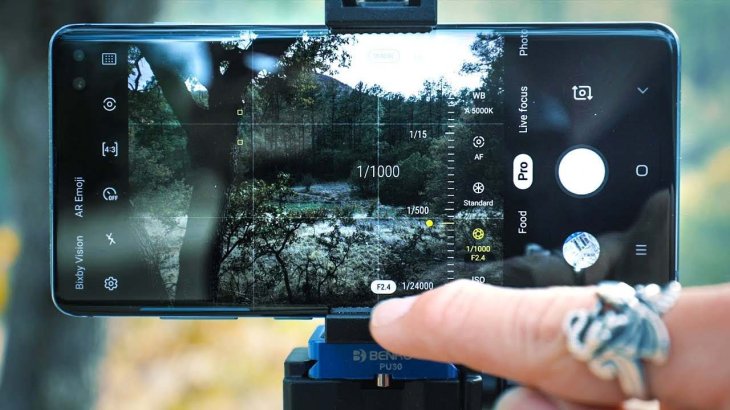
The Pro Mode provides you with a higher level of camera options and photo quality. However, users have to have some knowledge with photography to excel with this mode.
In landscape view, you can see the autofocus area as a grid of yellow squares. At the top left, you will see the option to change this. On the right, there is a list of options for changing the ISO, white balance, focus, shutter speed, exposure, and many more.
The Pro Mode can also let you save the images in RAW or JPEG formats.
How To Use Live Focus
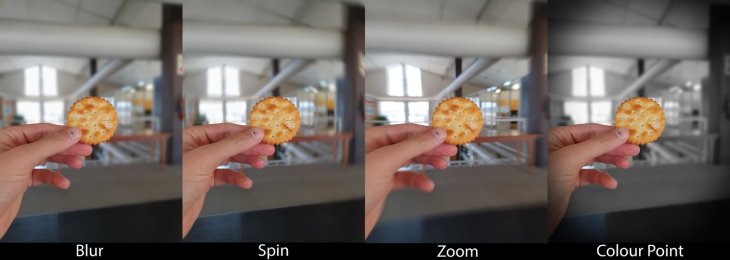
On the Galaxy S10, the Portrait Mode is called the Live Focus to have a blur effect behind the subject as well as adding the bokeh effect you see on DSLR cameras.
All you have to do is to choose the subject and adjust the level of blur by dragging the bar below. Samsung also gives you the Color, Spin, and Zoom options.
How To Shoot Great Video
The default settings will please most users, but if you want something more advanced, you should access the camera settings. The camera will produce 1080p videos by default, but users can pump it up to 4K at 60 fps.
If you have large TVs and something that can enable HDR10+, you should definitely toggle the option on. This feature is at the Advance recording options.
The Super steady option can smooth any shaking or wobbles, and this function can be initiated by tapping the hand icon or access settings and turn on the Video stabilization.
At 60 fps, the Video effects and Tracking auto-focus will not work. And with 4K at 60 fps, video stabilization will not take effect either.
Featured Stories

Mobile - Jun 11, 2026
Top Camera Phones Under ₹35,000: 2026 Edition Picks

Mobile - Jun 06, 2026
iOS 27 Promises Major Battery Gains for iPhones

Mobile - Jun 01, 2026
Honor Defies Expectations with a 10,000mAh Gaming Phone Just 7.98mm Thick

Mobile - May 30, 2026
Xiaomi 17T Pro Excels as Telephoto Champion with Monster Battery Life

Mobile - May 25, 2026
13 Underrated Google Wallet Features Youre Probably Ignoring (And Theyre Not...

Mobile - May 24, 2026
iOS 27 Preview: Apple Delivers Its Most Intelligent Siri Yet Alongside Fresh AI...

Mobile - May 19, 2026
RedMagic Introduces 11S Pro Gaming Phone Series Powered by Overclocked Snapdragon...

Mobile - May 18, 2026
iOS 26.5's Under-the-Radar Features: Secret iPhone Tools You Need to Try

Mobile - May 16, 2026
Trump Mobile Begins Shipping Its $499 Gold T1 Phone Following Prolonged Delays

Mobile - May 11, 2026
Sony Sets Xperia 1 VIII Reveal for May 13
Read more

ICT News- Jul 29, 2026
The RAM Crisis: Graphics cards shoot up in prices again
Until memory production capacity catches up, graphics cards are likely to remain more expensive than many enthusiasts hoped.
Comments
Sort by Newest | Popular