How To Import Emails Between Your Gmail Accounts
Dhir Acharya - Feb 18, 2020

There are certain situations when you feel the need to migrate all your emails from one Gmail address to another. This article provides detailed guidelines.
- You Can Now Edit Microsoft Office Files Right In Gmail
- has:attachment larger:10m, How To Check Google Storage Status
- Google To Start Showing Brand Logos In Gmail To Help You Avoid Scammers
There are certain situations when you feel the need to migrate all your emails from one address to another, such as when you want to move from a work address to a personal one or when you want to move to a new address with a more professional name. Regardless of the reason, Gmail allows you to move your email data between places. The easiest way to do this by setting up Post Office Protocol (POP) access, here’s how to do it.

Step 1: Configuring POP access in the old Gmail settings
In your old Gmail account, which you want to move emails from, open the inbox. Next, at the top right corner of the window, click on the gear icon then click on Settings, then choose Forwarding and POP/IMAP.
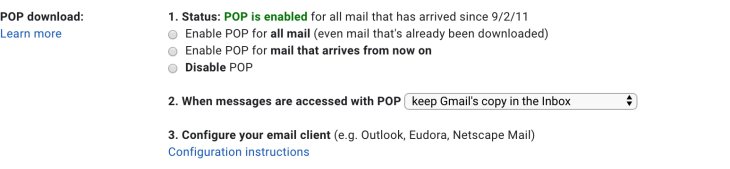
Toggle on the option Enable POP for all mail.
Next, in the drop-down menu under #2, you can choose to delete, archive, or keep the inbox’s copy, or just mark them all as read.
Finally, click on Save changes.
Step 2: Importing messages to the new Gmail account
To do this, you need to log into the new Gmail account that you want to move your emails to.
First, head to Settings then open Accounts and Import.
Now, under the heading Check email from other accounts, click on Add a mail account.
Next, type in the address that you are importing emails from then click on Next.
After that, choose Import emails from my other account (POP3).

Now, type in your account password and select “Always use a secure connection (SSL) when retrieving mail.” Toggle on or off options based on your own preferences for organizing and managing your messages.
Then click on Add account.
Next, choose if you want to send mails under the old alias. Then click on Next, then Next Steps.
For those using 2FA for your Gmail, your regular password will be useless here. You will have to visit Google Account, click on Security, choose Signing in to Google, then open App passwords. Then sign in to your account, choose the device and app you need a password for, then click on Generate.
Step 3: Confirming the connection between your accounts
After choosing to send messages with the alternate address, you will have to take several steps to verify that the two accounts are really yours. You will receive a confirmation email to the old address including a confirmation code as well as a verification link.
If the pop-up is still open from the previous step after you clicked Next Steps, you can type in the confirmation code there. If it’s closed, you can click on the verification link in the email or in your visit Settings, open Accounts and Import. Then, next to the email you are importing, click on Verify and follow the prompts to type in the confirmation code given to you.
>>> Voice In Will Give You Text-To-Speech Ability On Any Website
Featured Stories

How To - Mar 04, 2026
Getting Started with AI: A Newbie's Simple Guide

Features - Jun 11, 2025
Best VPN for PUBG Mobile 2025: Lower Ping & Regional Access Guide

How To - Jun 04, 2025
What is a VPN? Your Complete Guide to Safe Virtual Private Networks

How To - May 29, 2025
Receive Buffers And Other Tips To Improve Your Internet Connection

How To - May 21, 2025
How to unlock a disabled iPhone: a step-by-step guide

How To - Mar 31, 2025
Elevate Your Online Presence: Partnering with a Small Business Digital Marketing...

How To - Aug 03, 2023
What is the Yo-Yo test in Indian Cricket?

How To - Jul 10, 2023
Top 7 Stats Sites Every Cricket Fan Must Know

How To - Apr 27, 2023
How much does it cost to start an online casino in 2023

Review - Oct 17, 2022
Betting on Sports Events in the Fairplay App
Read more

ICT News- Jul 29, 2026
The RAM Crisis: Graphics cards shoot up in prices again
Until memory production capacity catches up, graphics cards are likely to remain more expensive than many enthusiasts hoped.
Comments
Sort by Newest | Popular