How To Have More Free Space On Your Phone Using Google Photos
Aadhya Khatri - Sep 30, 2019

Google Photos is available for both Android and iOS users. User will have 15GB for videos and photos for free
- You Can Now Transfer Photos From iCloud To Google Photos
- Google Apologizes For Leaking Private Videos In Google Photos
- Google Photos To Launch A Messaging Feature For Quick Conversation And Photo-Sharing
For those who have been using iPhones for long and find the free space iCloud offers is far from enough to store all of their media, the answer for you is Google Photos.
Google Photos is available for both iOS and Android users. User will have 15GB for videos and photos for free. If someone needs more storage, he or she will have to pay around Rs. 130 per month or Rs. 1300 per year for 100GB.
Once uploaded, feel free to delete them from your device to save some space. So here is the steps:
Depend on the OS you are using, Android or iOS, head to the according app store of the operating system and look for Google Photos.
When you finish downloading, the app will ask you to sign in your Gmail account or if you do not have one, create an account. This will be the email all of your photos will be saved to, so think carefully.
When you have logged in, a screen for Back Up & Sync will show up. Turn on the toggle (the button turns blue when you enable this function).
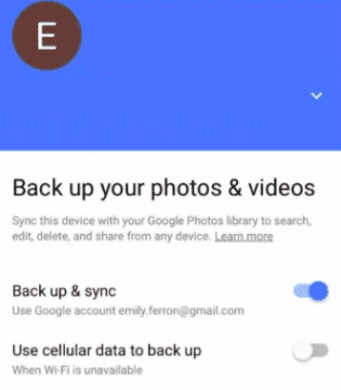
If Wi-Fi is currently unavailable to you, you have the choice to back up via cellular data. This option has one extra benefit, which is to help you avoid uploading in the background burning through your data. If you want to change this, head to Settings.
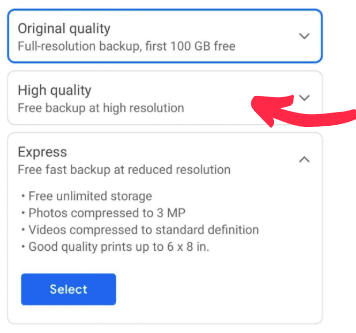
The next step is to choose the upload size you want. High Quality is the preference of many users as this size of photos will not eat up the free storage of 15GB that a free account can use. Plus, the photos' original quality will not be affected. When you have done, tap on Continue to move on uploading and backing your photos.
The sync and backup begin now. The duration of this process depends on the number of photos you have.
When the app has done backing up, it will show three tabs, with Assistant as one of them. The other two are Albums and Photos. To delete or organize your videos and photos, head to Albums and Photos. Under the Assistant tab, you will have some shortcuts of organizing things, as well as functions to create animations, movies, albums, collages, and many more.
When the media is uploaded to Google Photos, you can always view them from a desktop. All you have to do is to log in your Gmail account that linked to the app.
When you are sure that all of your precious videos and photos have been uploaded to a secure place, you can delete them from your phone for good. Or if you do not want to do that manually, Google Photos can do that for you.
Here is how to do that:
Locate the three-line icon at the top left of the screen, tap on it, and choose "Free up space." After that, the app will automatically find videos and images that you have backed up and delete them on the device. The last step is to confirm the removal so that Google Photos can proceed with deleting the media. Tap on Remove and you are done.
With Google Photos, it is now easier than ever to back up your media, and you have no excuse now not to do it. So the next time you drop your phone or somehow break it, at least you can be sure that all of your photos and videos are safe.
Featured Stories

How To - Mar 04, 2026
Getting Started with AI: A Newbie's Simple Guide

Features - Jun 11, 2025
Best VPN for PUBG Mobile 2025: Lower Ping & Regional Access Guide

How To - Jun 04, 2025
What is a VPN? Your Complete Guide to Safe Virtual Private Networks

How To - May 29, 2025
Receive Buffers And Other Tips To Improve Your Internet Connection

How To - May 21, 2025
How to unlock a disabled iPhone: a step-by-step guide

How To - Mar 31, 2025
Elevate Your Online Presence: Partnering with a Small Business Digital Marketing...

How To - Aug 03, 2023
What is the Yo-Yo test in Indian Cricket?

How To - Jul 10, 2023
Top 7 Stats Sites Every Cricket Fan Must Know

How To - Apr 27, 2023
How much does it cost to start an online casino in 2023

Review - Oct 17, 2022
Betting on Sports Events in the Fairplay App
Read more

ICT News- Jul 29, 2026
The RAM Crisis: Graphics cards shoot up in prices again
Until memory production capacity catches up, graphics cards are likely to remain more expensive than many enthusiasts hoped.
Comments
Sort by Newest | Popular