Facebook Messenger: 5 Essential Tips For iPhone Users
Anil Singh - Dec 27, 2019

If Facebook Messenger has already been installed onto your iPhone, here're the top 5 essential tips to better your experiences!
- Top 5 Facebook Messenger Hacker In 2020
- Facebook Updates Features To Messenger Kids So You Can Better Control Your Kids' Chats
- Facebook Requires New Messenger Users To Sign Up For An Account, Not Just A Phone Number
1. Mute notifications for a time period.
Messenger is useful, but not all its features. Tons of people are complaining about Messenger notifications that annoy them every day, but if they can start to manage these notifications in not only the Messenger app but also your phone’s settings based on your own preferences.
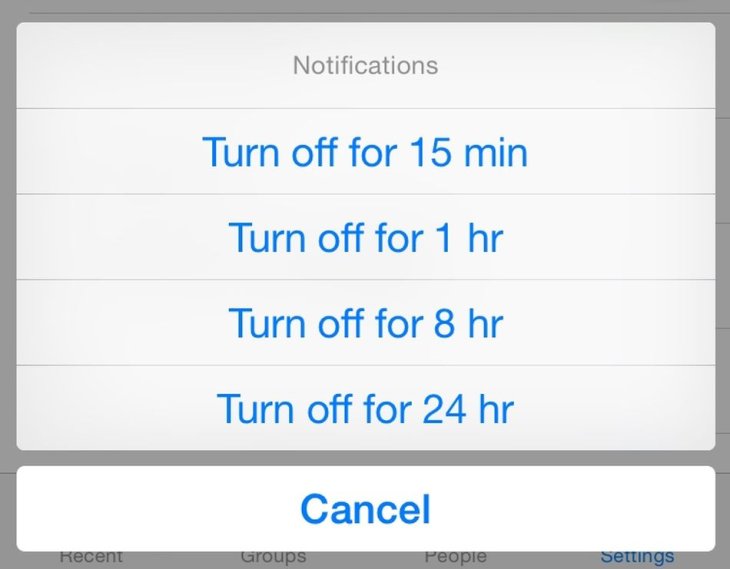
For Messenger’s settings: Open the app > choose a specific conversation that you don’t want to receive notifications anymore > tap on the “I” icon > click “Notifications” then decide to choose a time period that you’ll mute it.
For iPhone users, you can also change the “Notification” in the phone’s Settings menu. Head to your iPhone’s Settings board > Find “Messenger” > Choose “Notifications.”
2. Delete a message.
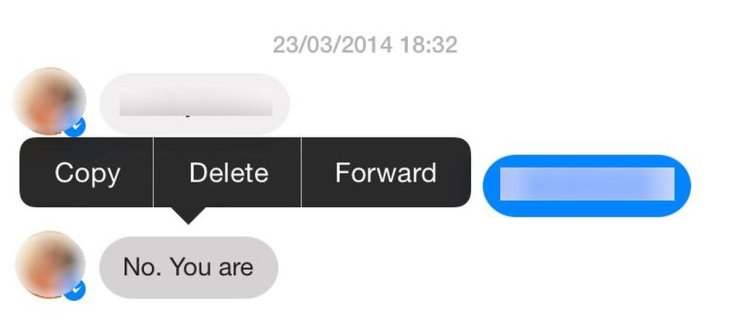
Instead of deleting an entire conversation with a friend, you can choose to delete every single message within that chatbox. Tap and hold on the intended message then you’ll see an option to “Delete” it immediately. Of course, you won’t be able to restore it in the future.
3. Check if a message has been delivered or read.
That read receipts should be available or not is still a matter of debate. In general, it allows one to learn about the status of the message such as delivery status or whether his/her friend has read the message.
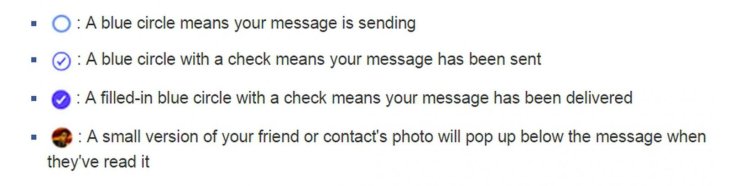
Just take a look at the circle icon on the right of that message. If it has been delivered, you’ll see a dark circle with a tick inside, if not, it shows a white circle. If your friend has read it, the circle will display his/her avatar.
4. Location data
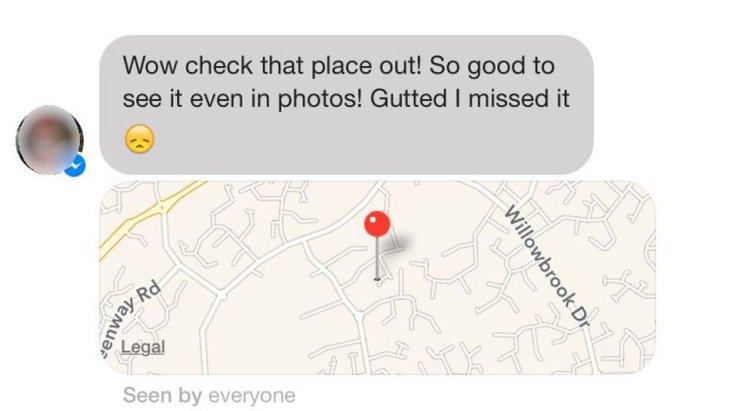
You can turn on/off your location data attached to a message within your iPhone's settings. Navigate to there > Privacy > Location Services > Find Messenger.
5. Pin a specific Group conversation for quick access.
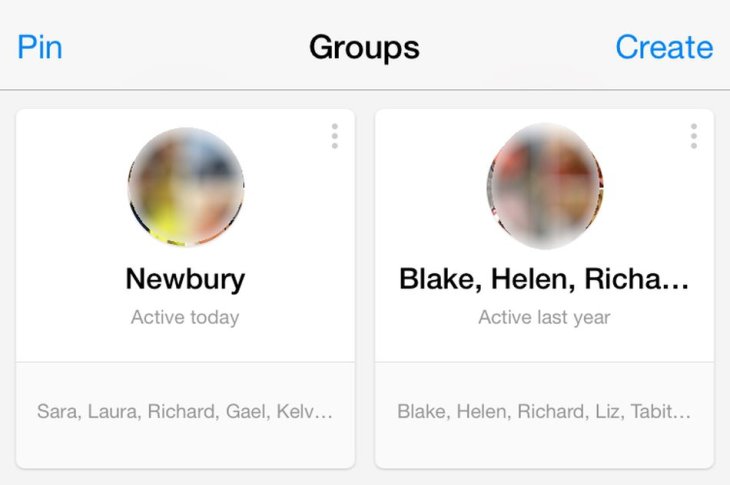
Your favorite chat group will be pinned for later quick access. Head to the “Group” tab > choose the “Pin” option > click on any Group chat you want it to appear on the top of the list.
Featured Stories

How To - Mar 04, 2026
Getting Started with AI: A Newbie's Simple Guide

Features - Jun 11, 2025
Best VPN for PUBG Mobile 2025: Lower Ping & Regional Access Guide

How To - Jun 04, 2025
What is a VPN? Your Complete Guide to Safe Virtual Private Networks

How To - May 29, 2025
Receive Buffers And Other Tips To Improve Your Internet Connection
How To - May 21, 2025
How to unlock a disabled iPhone: a step-by-step guide

How To - Mar 31, 2025
Elevate Your Online Presence: Partnering with a Small Business Digital Marketing...

How To - Aug 03, 2023
What is the Yo-Yo test in Indian Cricket?

How To - Jul 10, 2023
Top 7 Stats Sites Every Cricket Fan Must Know

How To - Apr 27, 2023
How much does it cost to start an online casino in 2023

Review - Oct 17, 2022
Betting on Sports Events in the Fairplay App
Read more

ICT News- Jul 29, 2026
The RAM Crisis: Graphics cards shoot up in prices again
Until memory production capacity catches up, graphics cards are likely to remain more expensive than many enthusiasts hoped.
Comments
Sort by Newest | Popular