How To Change Tips And Run The Ear Tip Fit Test On AirPods Pro
Aadhya Khatri - Oct 31, 2019

For new users, picking the right size and running the fitting test on AirPods Pro can be confusing at first. So follow our guide to save yourself some time.
- Apple AirPods Pro vs. Galaxy Buds Pro: Which One Is More Suitable For You?
- Are AirPods Waterproof? Here Is What You Should Know
- Apple Is Replacing Defective AirPods Pro For Free
For a better fit, the AirPods Pro comes with tips of three different sizes in the same box. Apple also offers a test for users to ensure users have the best choice of size. The test is based on the internal-facing microphone.
The AirPods come with the medium tips on, so you might want to test with them first and then try on the other two to find the best fit. The Ear Tip Fit Test will check if users have had the best seal possible.
There is a clip to secure the tips on the earbuds, so you might want to apply some force to remove them.
However, for new users, picking the right size, and running the fitting test can be confusing at first. So to help you save some time, here is our guide:
How To Change the Ear Tips On AirPods Pro
- The tips are in a square box at the bottom of the AirPods box.
- Choose the ones you want to test. Remember to pull them hard as they are attached to the packaging.
- When you remove the medium tips, make sure that you apply another firm pull to take them out.
- Make sure that the oval parts of the tips and the earbuds are lined up and then give them a press. When you hear a click, it means you have done it right.
How To Use The Ear Tip Fit Test For The Best Fit
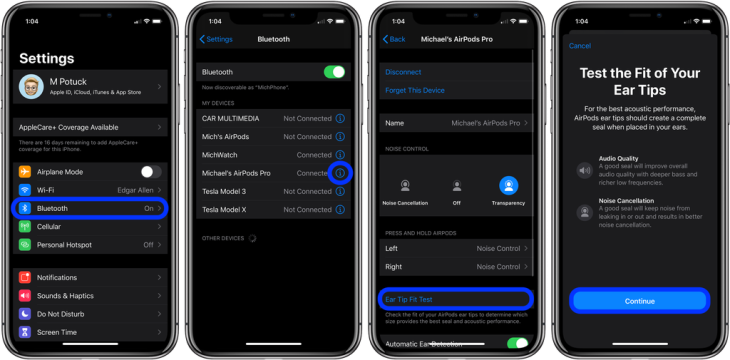
Step 1: Open Settings, and then Bluetooth on your iPhone.
Step 2: Tap on the letter “i” near the AirPods Pro.
Step 3: Select Ear Tip Fit test.
Step 4: Choose Continue to launch the test.
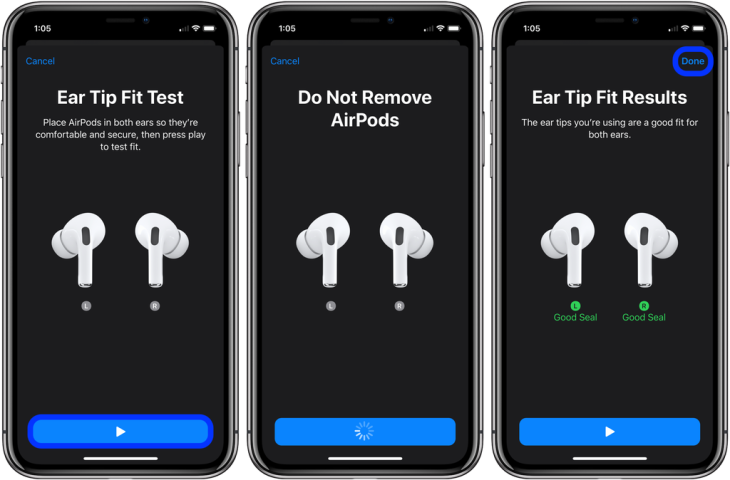
Step 4: Tap on the play button.
When the test finishes, choose “Done.”
Here are some pictures of the process:


Featured Stories

How To - Jul 25, 2025
Savant - Ascent REMIX Free Download (v1.2) - Electrifying Twin-Stick Shooter...

How To - Jul 25, 2025
Way of the Hunter Free Download (v1.23a) - The Ultimate Realistic Hunting...

How To - Jun 12, 2025
The Legend of Tianding Free Download (v1.01) - Become Taiwan's Legendary Outlaw

Features - Jun 11, 2025
Best VPN for PUBG Mobile 2025: Lower Ping & Regional Access Guide

How To - Jun 08, 2025
Telepath Tactics Liberated Free Download (v1.0.57) – The Ultimate Tactical RPG...

How To - Jun 07, 2025
The Mystery of Woolley Mountain Free Download – Whimsical Adventure Game

How To - Jun 07, 2025
We Need to Go Deeper – Complete Edition Free Download (v1.6.5)

How To - Jun 06, 2025
Pharaoh: A New Era Free Download – Build an Ancient Egyptian Empire

How To - Jun 04, 2025
Stardew Valley Free Download (v1.5.6) - Build Your Dream Farm

How To - Jun 04, 2025
Comments
Sort by Newest | Popular